What is a Windows NDES SCEP server?
SCEP (Simple Certificate Enrollment Protocol) is a protocol used to issue certificates with a Certificate Authority (CA) in a Public Key Infrastructure (PKI). It allows devices to request and receive certificates over a secure channel without user interaction. IT admins use SCEP for network devices, mobile devices, and other endpoints that need to authenticate themselves. The issued certificates can be used for various purposes, such as Wi-Fi authentication, VPN access, email encryption, etc. For example, a new mobile device can request a certificate from the SCEP server to authenticate on the corporate Wi-Fi network.
NDES (Network Device Enrollment Service) is a Microsoft implementation of the SCEP protocol. NDES is part of the Active Directory Certificate Services (AD CS) role in Windows Server.
Setting up a Windows NDES SCEP server
Before testing your Windows NDES SCEP server, you must set it up. Numerous articles and guides cover the installation and configuration of NDES. This article will focus on testing the NDES SCEP server to ensure the correct setup. We wrote this article because we could not find a comprehensive guide on how to test the NDES SCEP server.
Here are the high-level steps to configure a Windows NDES SCEP server:
- Create or use an existing Windows AD (Active Directory) server and domain.
- Install the Active Directory Certificate Services (AD CS) role on a Windows Server that is part of the AD domain.
- Configure the Enterprise NDES role service within AD CS.
- (Optional) Configure the certificate templates for NDES.
We used Windows Server 2022 for our tests, and we will update this article once we test with Windows Server 2025.
Test NDES using a web browser
First, we must make sure the NDES server is accessible via a web browser. If the server should be accessible outside the corporate network, test it using the public URL or IP address.
The NDES server has an admin web interface for retrieving the SCEP challenge. The URL typically looks like
http://ndes-server/certsrv/mscep_admin/ and requires authentication. The username must use the Windows name format,
like username@example.domain.com. Accessing this URL should prompt you to log in and display the SCEP challenge.
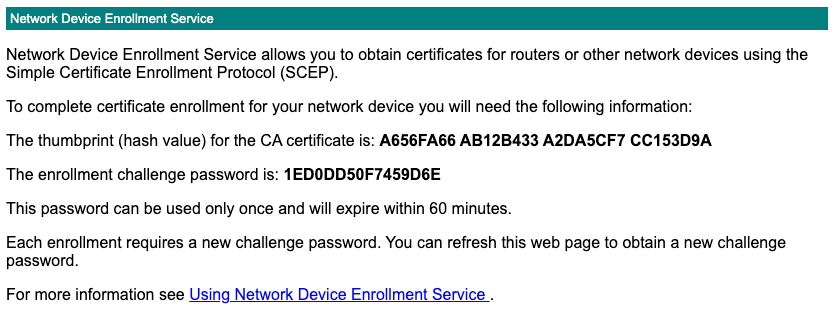
Note: The above admin page is encoded as UTF-16, as opposed to the more popular UTF-8 encoding. This encoding must considered when parsing this page with a script.
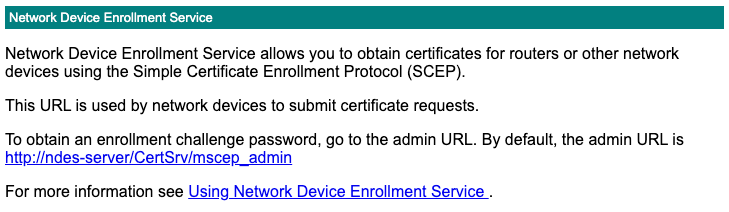
The other URL to test is the actual SCEP enrollment URL, typically http://ndes-server/certsrv/mscep/mscep.dll. It
returns the following.
Test NDES using PowerShell
For our first test, we will use PowerShell to request a certificate from another Windows machine in the same AD domain.
Below is a sample PowerShell script that requests a certificate from the NDES server. Update the URL and the challenge password.
After running the script, check that NDES issued a certificate.
Test NDES using a SCEP client
For our next test, we will use an SCEP client to request a certificate from the NDES server. Several SCEP clients are available, but many have been abandoned and do not work with NDES.
We will use micromdm/scep, a Go-based open-source SCEP server and client. We will
use the latest code from the main branch, with the following commit hash: 781f8042a79cabcf61a5e6c01affdbadcb785932.
Follow the instructions from the above URL to install the scep client. We built it for macOS M1 using the following
command:
make scepclient-darwin-arm64
After building the client, obtain a new enrollment challenge password and run the following command to request a certificate from the NDES server:
mkdir test
cd test
../scepclient-darwin-arm64 -key-encipherment-selector -cn "ScepClient" -challenge "ABBFE34CF11C2C04" -server-url "https://my-ndes.com/certsrv/mscep/mscep.dll" -debug -private-key ./ndes-pk
Note: We recommend running the above command in a separate directory because the SCEP client generates several intermediate files during the certificate request process. If you don’t clean them up, the client may reuse them instead of generating new ones from the command line flags.
The above command will generate a new certificate request and send it to the NDES server. The server will respond with a
signed certificate, which the client will save to the current directory as a client.pem file.
As a final step, verify that the certificate and the private key match by building a PKCS#12 file:
/usr/bin/openssl pkcs12 -export -inkey ndes-pk -in client.pem -out client.p12
Test NDES using Apple MDM profile
For our final test, we will use an Apple MDM profile to request a certificate from the NDES server. We will use a macOS VM enrolled in Fleet Device Management’s MDM server. However, adding the MDM profile manually via System Settings -> Profiles should also work.
First, create a new Device Management SCEP payload with the NDES server’s URL and the challenge password. Then, assign the SCEP payload to your device. Here’s an example payload:
<?xml version="1.0" encoding="UTF-8"?>
<!DOCTYPE plist PUBLIC "-//Apple//DTD PLIST 1.0//EN" "http://www.apple.com/DTDs/PropertyList-1.0.dtd">
<plist version="1.0">
  <dict>
    <key>PayloadContent</key>
    <array>
      <dict>
    <key>PayloadContent</key>
    <dict>
      <key>Challenge</key>
      <string>8E6D19CAEC9411CC</string>
      <key>Key Type</key>
      <string>RSA</string>
      <key>Key Usage</key>
      <integer>5</integer>
      <key>Keysize</key>
      <integer>2048</integer>
      <key>Retries</key>
      <integer>3</integer>
      <key>RetryDelay</key>
      <integer>10</integer>
      <key>Subject</key>
          <array>
            <array>
              <array>
                <string>CN</string>
                <string>MDM TEST VM</string>
              </array>
            </array>
            <array>
              <array>
                <string>OU</string>
                <string>FLEET DEVICE MANAGEMENT</string>
              </array>
            </array>
          </array>
      <key>URL</key>
      <string>https://my-ndes.com/certsrv/mscep/mscep.dll</string>
    </dict>
    <key>PayloadDisplayName</key>
    <string>SCEP #1</string>
    <key>PayloadIdentifier</key>
    <string>com.apple.security.scep.9DCC35A5-72F9-42B7-9A98-7AD9A9CCA3AA</string>
    <key>PayloadType</key>
    <string>com.apple.security.scep</string>
    <key>PayloadUUID</key>
    <string>9DCC35A5-72F9-42B7-9A98-7AD9A9CCA3AA</string>
    <key>PayloadVersion</key>
    <integer>1</integer>
      </dict>
    </array>
    <key>PayloadDisplayName</key>
    <string>SCEP cert</string>
    <key>PayloadIdentifier</key>
    <string>Victors-Fleet-MBP.4CD1BD65-1D2C-4E9E-9E18-9BCD400CDEDB</string>
    <key>PayloadType</key>
    <string>Configuration</string>
    <key>PayloadUUID</key>
    <string>4CD1BD65-1D2C-4E9E-9E18-9BCD400CDEDB</string>
    <key>PayloadVersion</key>
    <integer>1</integer>
  </dict>
</plist>
Once the device receives the payload, it immediately requests a certificate from the NDES server. The server responds with a signed certificate, which the device saves to the keychain.
Further reading
Recently, we covered how to connect to a remote Active Directory server.
We also wrote a series of articles on building a mutual TLS client which uses a system keystore, such as a Windows certificate store.
In addition, we presented an example of code signing a Windows application.
Watch how to test a Windows NDES SCEP server
Note: If you want to comment on this article, please do so on the YouTube video.