Traditionally, network routers used dedicated bare metal machines. However, in the last several years, we’ve seen a rise in software-based routers that can be deployed either on bare metal, on a VM, or even on a container. This means these virtual routers can be used to replace existing router software on an older router. They can run in the cloud. Or they can be installed on do-it-yourself (DIY) hardware. A couple popular open source software-based routers are pfSense and OPNsense.
Why use a virtual router?
For one, these routers offer enterprise-level features such as build-in VPN support, traffic analysis, and extensive diagnostics, among others. Another reason is that having a virtual router gives you the ability to experiment – you can install multiple routers on top of your hypervisor, and try all of them out. A third reason is that the virtual router may be only one of many VMs that you run on your hardware. You can use the same piece of hardware to run a router, an ad-blocking service, a media server, and other applications.
Advanced virtual router installation and set up
When setting up our virtual router, we chose to use PCI Passthrough to allow the virtual router direct access to the NIC hardware. Direct access to hardware improves the latency of our internet traffic. In addition, we wanted our hypervisor to sit behind the router, and not be exposed to the public. This reduces the attack surface for potential bad agents. However, routing hypervisor traffic through the router made our setup a bit tricker. It is like the chicken or the egg dilemma – how do you put your hypervisor behind the router when the hypervisor is responsible for managing the router? Below is the approach we used when installing pfSense on top of Proxmox Virtual Environment (PVE).
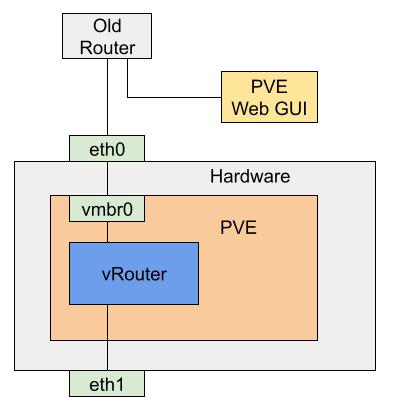
For the initial installation, we did not use PCI Passthrough and instead used a virtual network bridge (vmbr0). We configured the router VM to start on boot.

Initial virtual router configuration
This allowed us to continue controlling the virtual router through the PVE web GUI. We set up the router and enabled access to it through the serial interface, which we used in the next step. Then, we put the system into its final configuration.

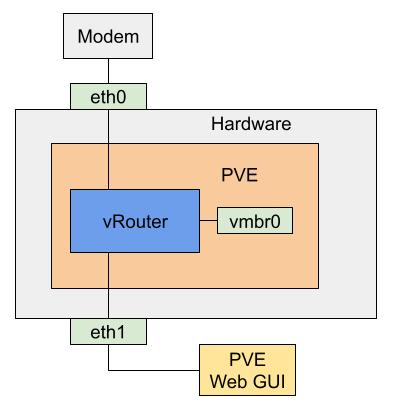
Final virtual router configuration
In order to finish configuring, we had to plug in a monitor and keyboard into our hardware. We accessed the virtual router via the serial interface from the PVE command line:
qm terminal 100
We updated the WAN interface to use eth0. At this point, the LAN interface eth1 had access to the internet.
In addition, we added a second LAN interface for the network bridge (vmbr0). We made sure firewall configurations for both LAN interfaces were the same.
Next, from the PVE command line, we updated the PVE IP and gateway to point at the router by modifying the following files.
/etc/network/interfaces
/etc/hosts
After rebooting PVE, we had access to the internet and to the PVE Web GUI from our new LAN.
Updating router software
Using a virtual router with PCI Passthrough creates a unique challenge when doing software updates. What if the new version doesn’t work? What if you lose all internet access.
We can mitigate potential issues. First, we recommend always making a backup of the router VM when upgrading. That way we can easily roll back the change. Switching to a backup, however, requires keyboard and monitor access to your hardware, since it must be done via the PVE command line.
Another way to safely upgrade is to spin up a second VM running updated router software. The second VM can be either from a backup or brand new. This VM should use virtual network bridges for its connections. Once it is properly configured, we can stop the first router VM and switch the port connections to the second VM. This flow also requires accessing the router via the serial interface to update the WAN/LAN interfaces.
Further reading
Recently, we have been setting up VLANs on our home network.
