What is mTLS (mutual TLS)?
TLS stands for Transport Layer Security. It is a cryptographic protocol that provides privacy and data integrity between two communicating applications. It is the successor to SSL (Secure Sockets Layer).
In ordinary (non-mutual) TLS, the client authenticates the server, but the server does not authenticate the client. Most websites use regular TLS. The client (web browser) knows it is talking to the correct server (website), but the server knows very little about the client. Instead, web applications use other client authentication methods, such as passwords, cookies, and session tokens.
Mutual TLS (mTLS) is a way to authenticate both the client and the server in a TLS connection. It is also known as client certificate authentication. In addition to the server authenticating itself to the client, the client also authenticates itself to the server.
mTLS is helpful as an additional layer of security. It is used in many applications, including:
- VPNs
- Microservices
- Service mesh
- IoT (Internet of Things)
- Mobile apps
How does Fleet Device Management use mTLS?
Many of Fleet’s customers use mTLS as an additional layer of security to authenticate the Fleet server to the Fleet agent. The Fleet agent is a small program that runs on each host device, such as a corporate laptop. It collects information about the host and sends it to the Fleet server.
How does mTLS work?
TLS is a complex protocol with multiple versions (1.2, 1.3, etc.). We will only go over the basics to understand how mTLS works.
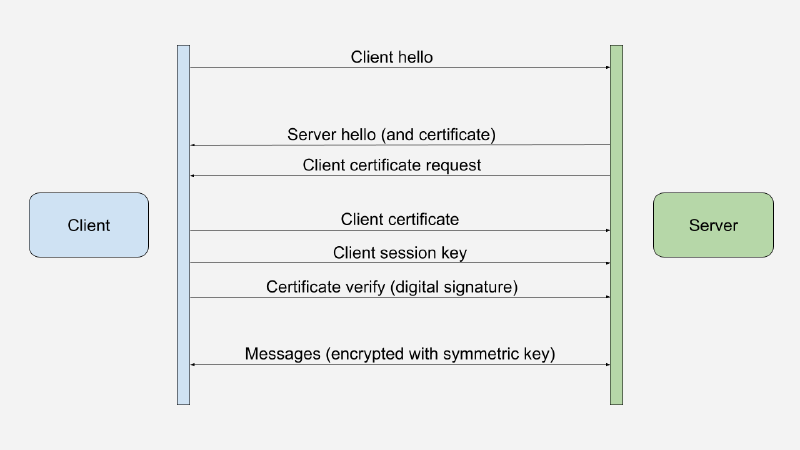
TLS uses a handshake protocol to establish a secure connection. The handshake protocol is a series of messages between the client and the server.
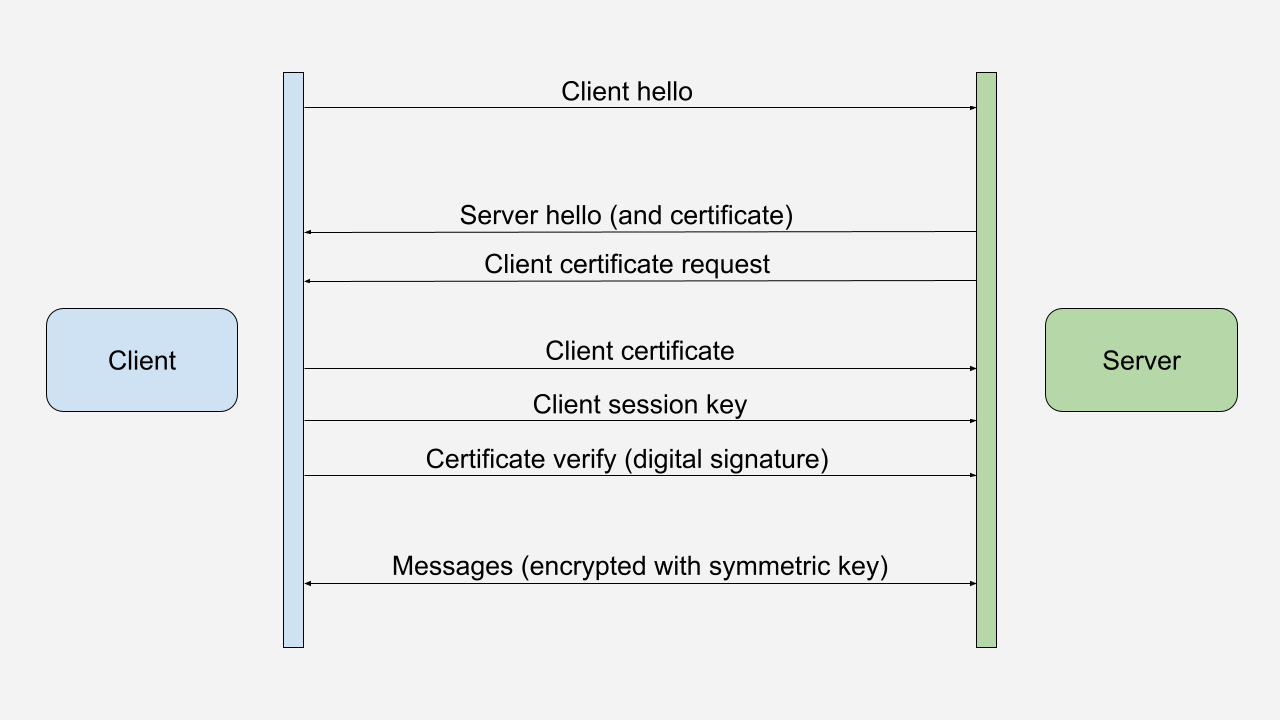
The client sends a “Client Hello” message to the server. The server responds with a “Server Hello” message and sends its certificate to the client. As an additional step for mTLS, the server requests a certificate from the client.
The client verifies the server’s certificate by checking the certificate’s signature and verifying that the certificate is valid and has not expired. The client also checks that the server’s hostname matches the hostname in the certificate.
The client uses the server’s public key to encrypt the messages sent to the server, including the session key and its certificate. The server decrypts these messages with its private key.
The client also sends a digital signature, encrypted with its private key, to the server. The server verifies the signature by decrypting it with the client’s public key.
At this point, both the client and the server have verified each other’s identity. They complete the TLS handshake and can exchange encrypted messages using a symmetric session key.
Generate certificates and keys
We will use the OpenSSL command line tool to generate the certificates. OpenSSL is a popular open-source library for TLS and SSL protocols.
The following script generates the certificates and keys for the client and the server. It also creates two certificate authorities (CAs) and signs the client and server certificates with their respective CA. The same CA may sign the certificates, but we will use separate CAs for this example.
#!/bin/bash

# This script generates files needed for mTLS.

mkdir -p certs

# Private keys for CAs
openssl genrsa -out certs/server-ca.key 2048
openssl genrsa -out certs/client-ca.key 2048

# Generate CA certificates
openssl req -new -x509 -nodes -days 1000 -key certs/server-ca.key -out certs/server-ca.crt
openssl req -new -x509 -nodes -days 1000 -key certs/client-ca.key -out certs/client-ca.crt

# Generate a certificate signing request
openssl req -newkey rsa:2048 -nodes -keyout certs/server.key -out certs/server.req
openssl req -newkey rsa:2048 -nodes -keyout certs/client.key -out certs/client.req

# Have the CA sign the certificate requests and output the certificates.
openssl x509 -req -in certs/server.req -days 1000 -CA certs/server-ca.crt -CAkey certs/server-ca.key -set_serial 01 -out certs/server.crt -extfile localhost.ext
openssl x509 -req -in certs/client.req -days 1000 -CA certs/client-ca.crt -CAkey certs/client-ca.key -set_serial 01 -out certs/client.crt

# Clean up
rm certs/server.req
rm certs/client.req
The localhost.ext file is used to specify the hostname for the server certificate. In our example, we will use
localhost. The file contains the following:
authorityKeyIdentifier=keyid,issuer
basicConstraints=CA:FALSE
keyUsage = digitalSignature, nonRepudiation, keyEncipherment, dataEncipherment
subjectAltName = @alt_names

[alt_names]
DNS.1 = localhost
Run the mTLS server
We will use nginx as our mTLS server. nginx is a popular open-source web server.
Using docker compose, we can run two nginx servers. One server will use ordinary TLS, and one will use mutual TLS. We
will use the following docker-compose.yml file:
---
version: "2"
services:
  nginx-tls:
    image: nginx
    volumes:
      - ./certs/server.crt:/etc/nginx/certificates/server.crt
      - ./certs/server.key:/etc/nginx/certificates/server.key
      - ./nginx-tls/nginx.conf:/etc/nginx/conf.d/default.conf
      - ./nginx-tls/hello-world.txt:/www/data/hello-world.txt
    ports:
      - "8888:8888"
  nginx-mtls:
    image: nginx
    volumes:
      - ./certs/server.crt:/etc/nginx/certificates/server.crt
      - ./certs/server.key:/etc/nginx/certificates/server.key
      - ./certs/client-ca.crt:/etc/nginx/certificates/client-ca.crt
      - ./nginx-mtls/nginx.conf:/etc/nginx/conf.d/default.conf
      - ./nginx-mtls/hello-world.txt:/www/data/hello-world.txt
    ports:
      - "8889:8889"
The nginx-tls service uses the nginx-tls/nginx.conf file, which contains the following:
server {
    listen 8888 ssl;
    server_name tls-hello-world;

    # Server TLS certificate (client must have the CA cert to connect)
    ssl_certificate /etc/nginx/certificates/server.crt;
    ssl_certificate_key /etc/nginx/certificates/server.key;

    location / {
        root /www/data;
    }
}
The nginx-mtls service uses the nginx-mtls/nginx.conf file, which contains the following:
server {
    listen 8889 ssl;
    server_name mtls-hello-world;

    # Server TLS certificate (client must have the CA cert to connect)
    ssl_certificate /etc/nginx/certificates/server.crt;
    ssl_certificate_key /etc/nginx/certificates/server.key;

    # Enable mTLS
    ssl_client_certificate /etc/nginx/certificates/client-ca.crt;
    ssl_verify_client on;

    location / {
        root /www/data;
    }
}
The hello-world.txt files contain a simple text message.
Connect to the mTLS server with curl client
We can connect to the mTLS server with the curl command line tool. We will use the following command:
curl https://localhost:8889/hello-world.txt --cacert ./certs/server-ca.crt --cert ./certs/client.crt --key ./certs/client.key
The --cacert option specifies the CA certificate that signed the server certificate. The --cert and --key options
select the client certificate and key.
To connect to the ordinary TLS server, we do not need to specify the client certificate and key:
curl https://localhost:8888/hello-world.txt --cacert ./certs/server-ca.crt
Curl can use --insecure to ignore the server certificate:
curl --insecure https://localhost:8888/hello-world.txt
However, it is impossible to ignore the client certificate for mTLS. The server will reject the connection if the client does not provide a valid certificate.
Example code on GitHub
The example code is available on GitHub at https://github.com/getvictor/mtls/tree/master/hello-world
Securing mTLS certificates and keys
In the next article, we will secure the mTLS certificates and keys with the macOS keychain.
In a later article, we also secure the mTLS certificates and keys with the Windows certificate store.
This article is part of a series on mTLS.
Further reading
- How to Use TPM 2.0 to Secure Private Keys Learn how to create, manage, and use TPM-backed keys, including parent/child key hierarchies and secure signing.
mTLS Hello World video
Note: If you want to comment on this article, please do so on the YouTube video.