- Obtain VPN connection details
- Point your computer to the remote Active Directory DNS server
- Join your computer to the Active Directory domain
- Log in with your Active Directory credentials
What is Active Directory?
Active Directory is a directory service developed by Microsoft for Windows domain networks. It provides authentication and authorization services and a framework for organizing and managing resources in a networked environment. Active Directory stores information about users, computers, and other network objects, making managing and securing your network easier.
Active Directory runs on Windows Server and is the central component of many Windows-based networks. It is the central piece for a variety of services, including:
- Certificate Services (AD CS)
- Lightweight Directory Services (AD LDS)
- Federation Services (AD FS)
- Rights Management Services (AD RMS)
- and many others
Why connect to a remote Active Directory server?
With the rise of remote work and distributed teams, you may need to connect your home computer to a remote Active Directory server. This connection allows you to access network resources, authenticate with your company’s domain, and use services that rely on Active Directory.
The recommended way to connect to a remote Active Directory server is through a VPN (Virtual Private Network). A VPN creates a secure connection between your computer and the remote network, allowing you to access resources as if you were physically connected.
Steps to connect to a remote Active Directory server
1. Obtain VPN connection details
Contact your IT department or network administrator to obtain the VPN connection details. You will need the following information:
- VPN server address
- VPN type (e.g., PPTP, L2TP/IPsec, OpenVPN)
- VPN username and password
- Any additional settings or requirements, such as a private key or certificate
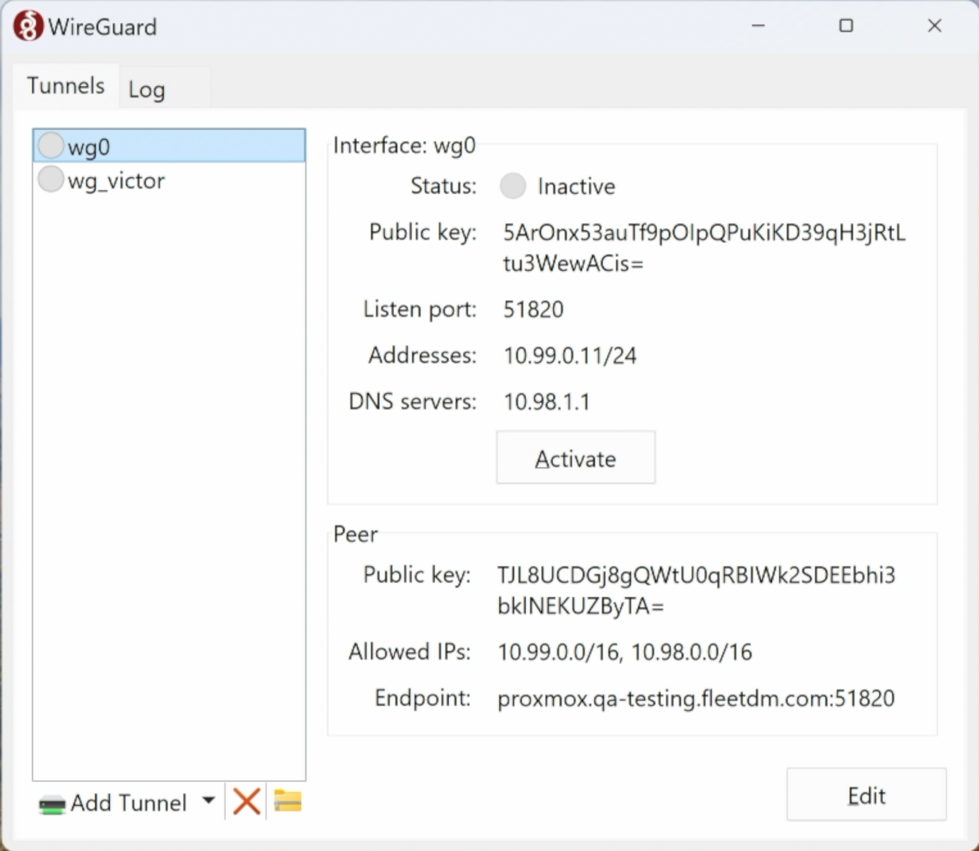
For our example, we are using WireGuard, a modern VPN protocol known for its simplicity and security.

Note: The Allowed IPs field above specifies which IP addresses will be routed through the VPN. Make sure to include
the IP addresses of the remote Active Directory server. Also, ensure the IP addresses do not conflict with your local
network.
Install the VPN client on your computer and activate the VPN connection using the provided details.
Test the VPN connection by pinging the remote Active Directory server.
PS C:\Users\victor> ping 10.98.1.1

Pinging 10.98.1.1 with 32 bytes of data:
Reply from 10.98.1.1: bytes=32 time=155ms TTL=127
Reply from 10.98.1.1: bytes=32 time=156ms TTL=127
Reply from 10.98.1.1: bytes=32 time=156ms TTL=127
Reply from 10.98.1.1: bytes=32 time=156ms TTL=127

Ping statistics for 10.98.1.1:
    Packets: Sent = 4, Received = 4, Lost = 0 (0% loss),
Approximate round trip times in milli-seconds:
    Minimum = 155ms, Maximum = 156ms, Average = 155ms
2. Point your computer to the remote Active Directory DNS server
To use Active Directory, your computer must know where to find the domain controller. This information is stored in the DNS (Domain Name System) settings.
Since we are using a VPN to connect to the remote Active Directory server, we need to update the DNS settings of our VPN connection.
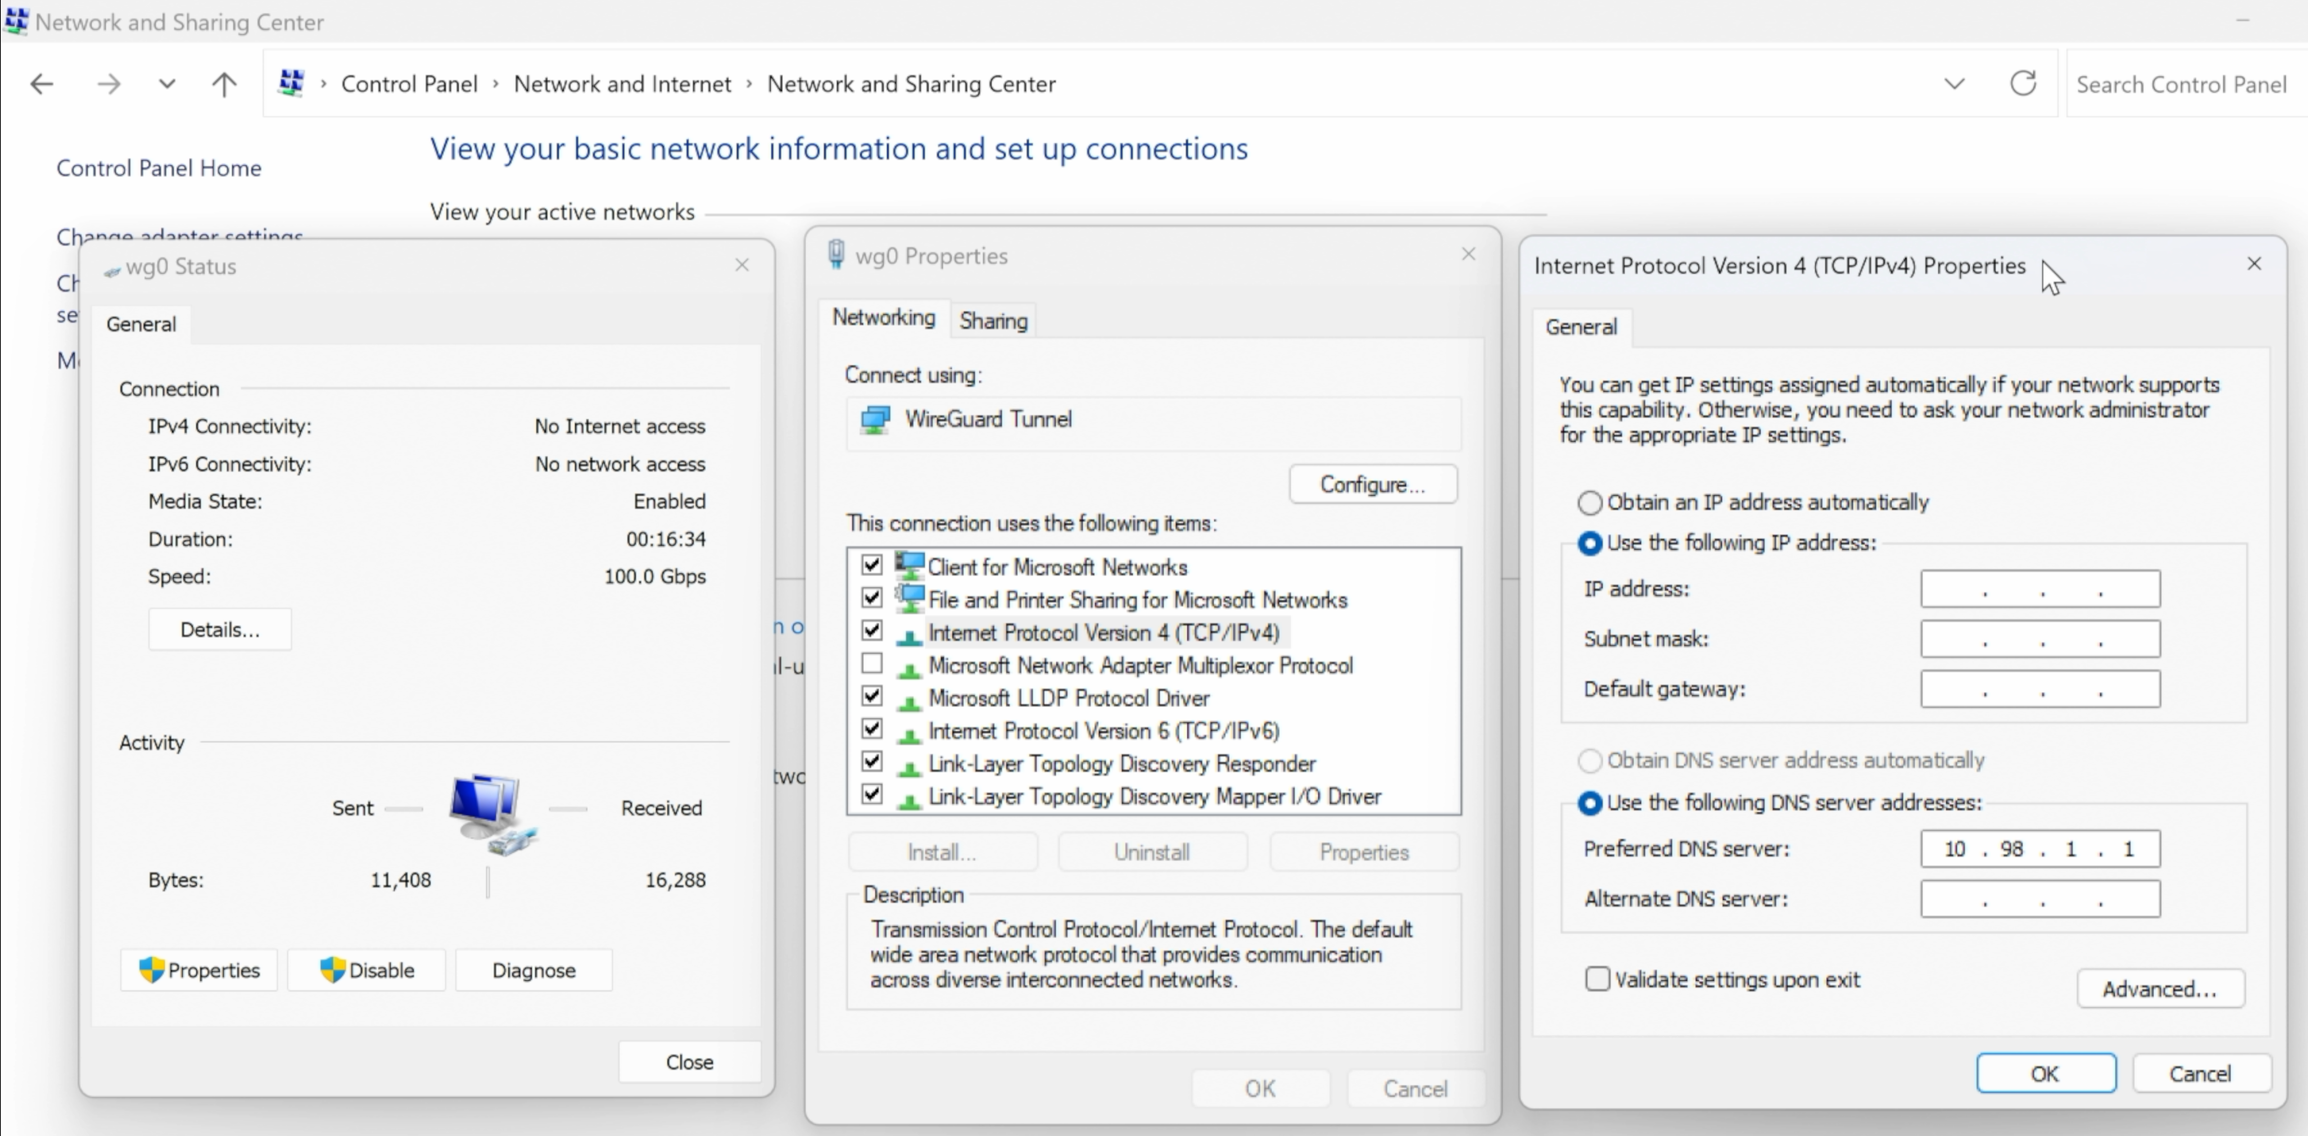
In the VPN settings above, we specified the DNS server as part of the WireGuard configuration.
DNS = 10.98.1.1
Alternatively, we can manually set the DNS server for the VPN connection in Control Panel > Network and Sharing Center > your VPN connection > Properties > Networking > Internet Protocol Version 4 (TCP/IPv4) > Properties.

3. Join your computer to the Active Directory domain
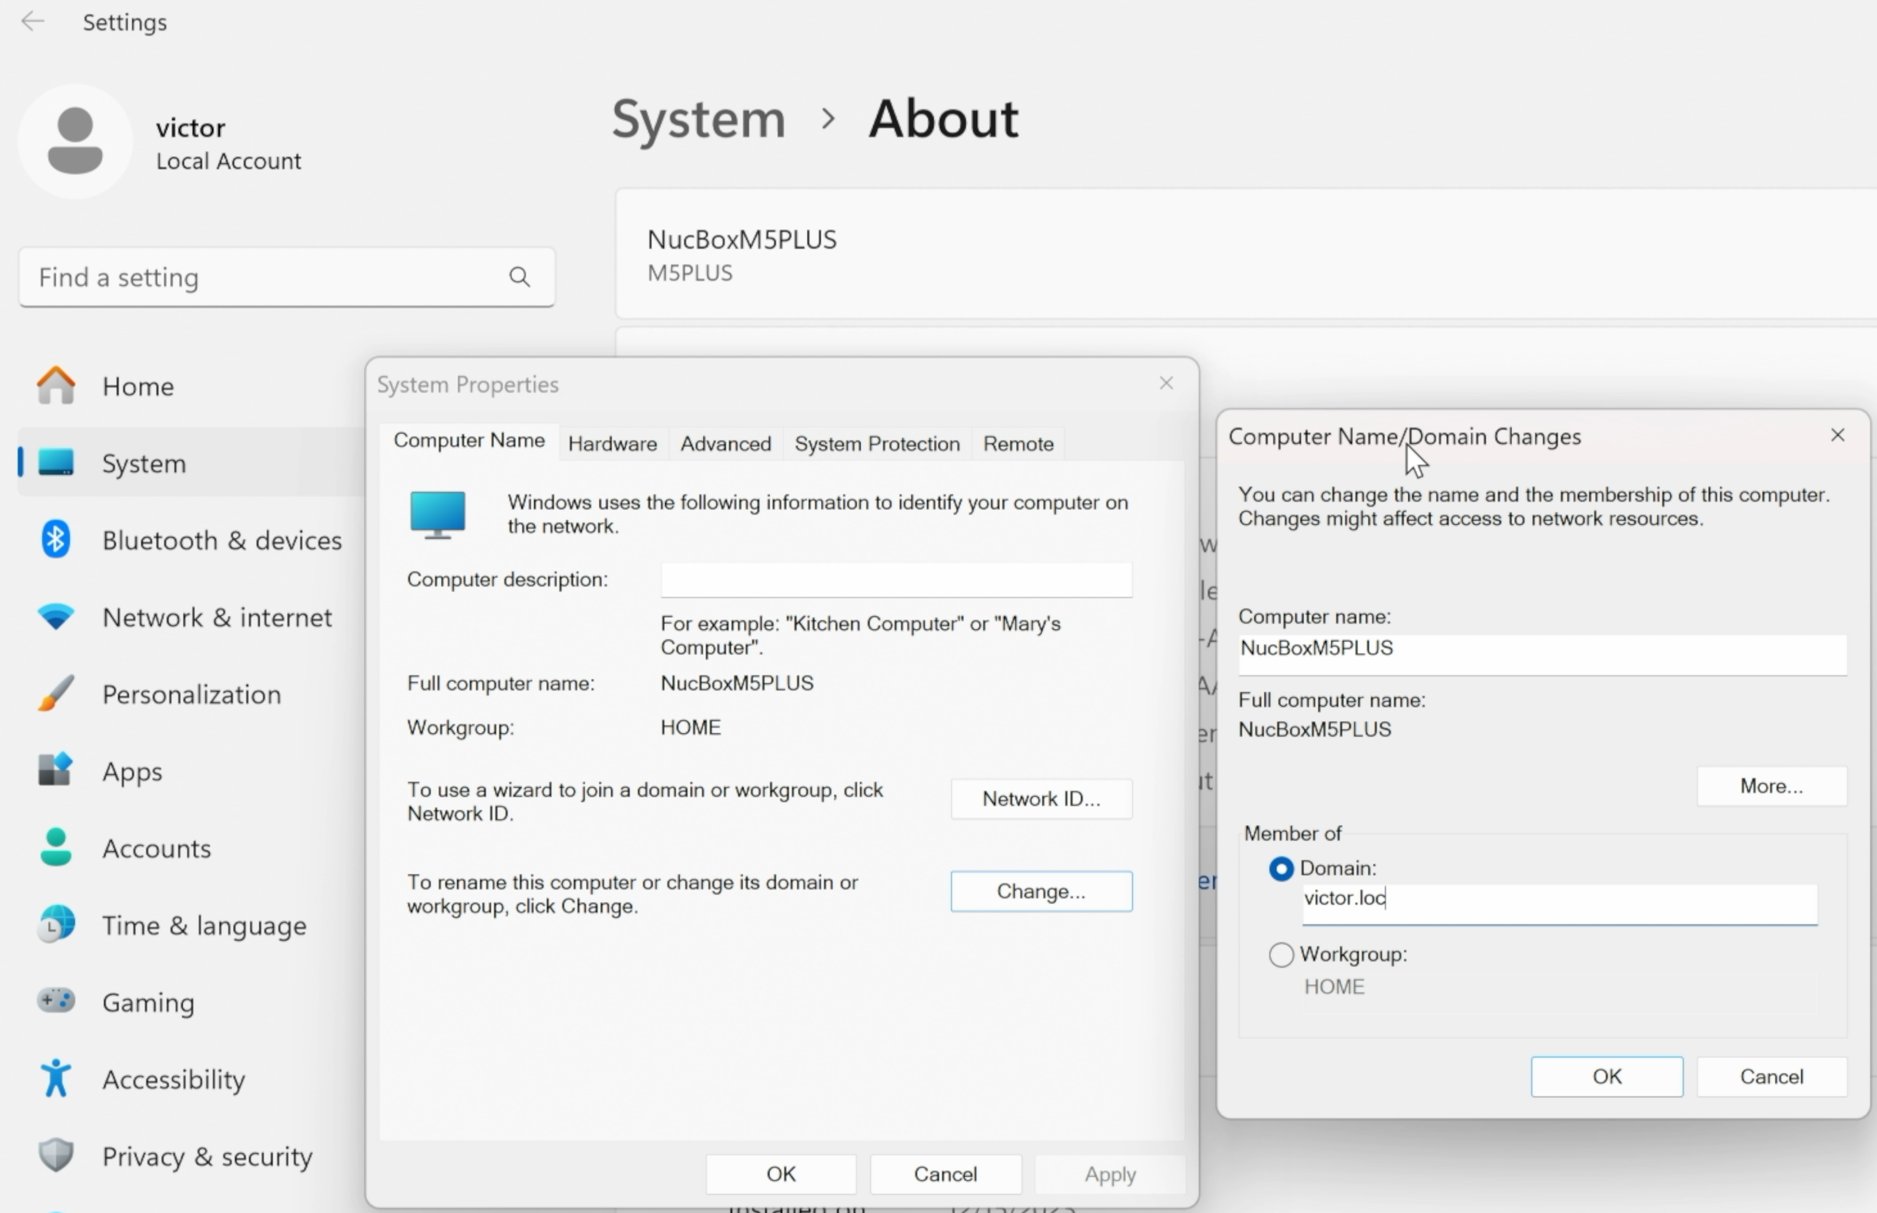
Open Control Panel > System and Security > System > Domain or workgroup > Change….
Enter the domain name provided by your IT department. You can also change your computer name if necessary.

Click OK and enter your domain credentials when prompted. You must have permission from Active Directory to join a computer to the domain.
After a few seconds, you should see a message indicating that your computer has successfully joined the domain.

You must restart your computer for the changes to take effect.
4. Log in with your Active Directory credentials
Your VPN connection must be active to log in with your Active Directory credentials after joining the domain. Some VPN clients allow you to connect before logging in to Windows. This feature ensures that your computer can reach the domain controller during the login process.
If your VPN client does not support connecting before logging in, you may need to log in with a local account first and then connect to the VPN. Then, you can switch users and login with your Active Directory credentials.
Additional information
The local computer caches credentials for Active Directory users. You can log in to your computer with your Active Directory credentials on subsequent logins, even when you are not connected to the domain. For example, you can log in and then connect to the VPN.
After joining the domain, we found that our local computer refused SSH connections from other local computers. We resolved this issue by allowing SSH access in Active Directory settings.
Further reading
- Recently, we covered how to test a Windows NDES SCEP server.
- Previously, we explained how to code sign a Windows application.
Watch how to connect to remote Active Directory server
Note: If you want to comment on this article, please do so on the YouTube video.
