What is code signing?
Code signing is the process of digitally signing executables and scripts to confirm the software author and guarantee that the code has not been altered or corrupted since it was signed. The method employs a cryptographic hash to validate the authenticity and integrity of the code.
The benefits of code signing
Code signing provides several benefits:
- User trust: Users are likelier to trust signed software because they can verify its origin.
- Security: Code signing helps prevent tampering and makes sure that bad actors have not altered the software.
- Malware protection: Code signing helps protect users from malware by verifying the software’s authenticity.
- Software updates: Code signing helps users verify that software updates are legitimate and not malicious.
- Windows Defender: Code signing helps prevent Windows Defender warnings.
Code signing process for Windows
The code signing process for Windows involves the following steps:
- Obtain a code signing certificate: Purchase a code signing certificate from a trusted certificate authority (CA) or use a self-signed certificate.
- Sign the code: Use a code signing tool to sign the code with the code signing certificate.
- Timestamp the signature: Timestamp the signature to make sure that the signature remains valid even after the certificate expires.
- Distribute the signed code: Distribute the signed code to users.
- Verify the signature: Users can verify the signature to confirm the software’s authenticity.
Obtaining a code signing certificate
In our example, we will use a self-signed certificate. This approach is suitable for internal business applications. For public applications, you should obtain a code signing certificate from a trusted CA.
We will use the OpenSSL command line tool to generate the certificates. OpenSSL is a popular open-source library for TLS and SSL protocols.
The following script generates the certificate and key needed for code signing. It also generates a certificate authority (CA) and signs the code signing certificate with the CA.
#!/usr/bin/env bash

# -e: Immediately exit if any command has a non-zero exit status.
# -x: Print all executed commands to the terminal.
# -u: Exit if an undefined variable is used.
# -o pipefail: Exit if any command in a pipeline fails.
set -exuo pipefail

# This script generates certificates and keys needed for code signing.

mkdir -p certs

# Certificate authority (CA)
openssl genrsa -out certs/ca.key 2048
openssl req -new -x509 -nodes -days 1000 -key certs/ca.key -out certs/ca.crt -subj "/C=US/ST=Texas/L=Austin/O=Your Organization/OU=Your Unit/CN=testCodeSignCA"

# Generate a certificate for code signing, signed by the CA
openssl req -newkey rsa:2048 -nodes -keyout certs/sign.key -out certs/sign.req -subj "/C=US/ST=Texas/L=Austin/O=Your Organization/OU=Your Unit/CN=testCodeSignCert"
openssl x509 -req -in certs/sign.req -days 398 -CA certs/ca.crt -CAkey certs/ca.key -set_serial 01 -out certs/sign.crt

# Clean up
rm certs/sign.req
Building the application
We will build a simple “Hello World” Windows application using the Go programming language for this example. We compile the application with:
export GOOS=windows
export GOARCH=amd64
go build ./hello-world.go
The Go build process generates the hello-world.exe Windows executable.
Signing and timestamping the code
To sign the code, we will use osslsigncode, an open-source code signing tool that uses OpenSSL to sign Windows executables. Unlike Microsoft’s signtool, osslsigncode is cross-platform and can be used on Linux and macOS.
To sign the code, we use the following script:
#!/usr/bin/env bash

# -e: Immediately exit if any command has a non-zero exit status.
# -x: Print all executed commands to the terminal.
# -u: Exit if an undefined variable is used.
# -o pipefail: Exit if any command in a pipeline fails.
set -exuo pipefail

input_file=$1

if [ ! -f "$input_file" ]
then
    echo 'First argument must be path to binary'
    exit 1
fi

# Check that input file is a windows PE (Portable Executable)
if ! ( file "$input_file" | grep -q PE )
then
    echo 'File must be a Portable Executable (PE) file.'
    exit 0
fi

# Check that osslsigncode is installed
if ! command -v osslsigncode >/dev/null 2>&1 ; then
    echo "osslsigncode utility is not present or missing from PATH. Binary cannot be signed."
    exit 1
fi

orig_file="${input_file}_unsigned"

mv "$input_file" "$orig_file"

osslsigncode sign -certs "./certs/sign.crt" -key "./certs/sign.key" -n "Hello Windows code signing" -i "https://victoronsoftware.com/" -t "http://timestamp.comodoca.com/authenticode" -in "$orig_file" -out "$input_file"

rm "$orig_file"
In addition to signing the code, we timestamp the signature using the Comodo server. Timestamping makes sure the signature remains valid even after the certificate expires or is invalidated.
We can use osslsigncode to verify the signature:
#!/usr/bin/env bash
input_file=$1
osslsigncode verify -CAfile ./certs/ca.crt "$input_file"
Distributing and manually verifying the signed code
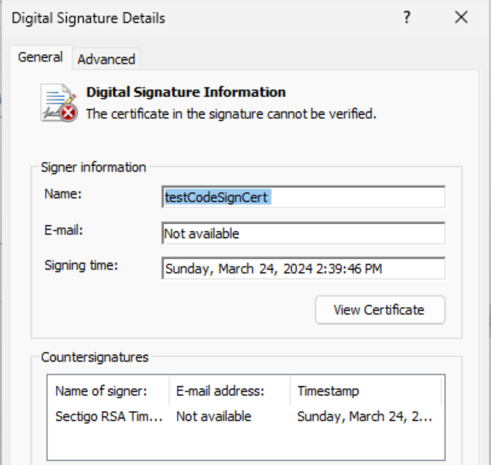
After signing the code, we can distribute the signed executable to users. Users can manually verify the signature by right-clicking the executable, selecting “Properties,” and navigating to the “Digital Signatures” tab. The user can then view the certificate details and verify that the signature is valid.
However, since we are using the self-signed certificate, users will see a warning that the certificate is not trusted. Our self-signed certificate is not trusted because the certificate authority is not part of the Windows trusted root certificate store.

Certificate in code signature cannot be verified
We can add the certificate authority to the Windows trusted root certificate store with the following Powershell command:
Import-Certificate -FilePath "certs\ca.crt" -CertStoreLocation Cert:\LocalMachine\Root
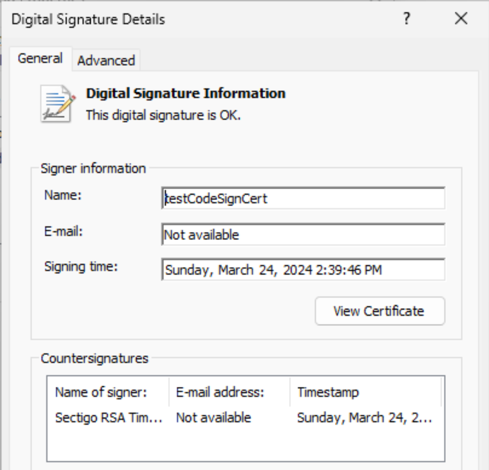
After adding the certificate authority to the trusted root certificate store, users will see that the certificate is trusted and the signature is valid.

Certificate in code signature is be verified
Code signing using a certificate from a public CA
To sign public applications, we must obtain a code signing certificate from a trusted CA. The latest industry standards require private keys for code signing certificates to be stored in hardware security modules (HSMs) to prevent unauthorized access. This security requirement means certificates for code signing in CI/CD pipelines must use a cloud HSM vendor or a private pipeline runner with an HSM.
In a future article, we will explore signing a Windows application using a cloud HSM vendor.
Example code on GitHub
The example code is available on GitHub at https://github.com/getvictor/code-sign-windows
