
This article is part of our series on building a Chrome extension.
Why add unit tests?
Unit tests help us catch bugs early, ensure our extension continues to work as expected in different scenarios, and make it easier to refactor our code. In this article, we will add unit tests to our Chrome extension.
Add Jest to the project
Jest is a popular JavaScript testing framework. We will use Jest to write and run unit tests for our Chrome extension.
To install Jest, run:
npm install --save-dev jest jest-environment-jsdom ts-jest @types/jest
- jest is the testing framework
jest-environment-jsdomsimulates a browser environment for Jest tests- ts-jest allows Jest to work with TypeScript
@types/jestprovides TypeScript definitions for Jest
Configure Jest
Create a jest.config.ts file in the root of the project with the following content:
import type { JestConfigWithTsJest } from "ts-jest"

const config: JestConfigWithTsJest = {
    setupFiles: ["./__mocks__/chrome.ts"],
    testEnvironment: "jsdom",
    transform: {
        "^.+.ts$": ["ts-jest", {}],
    },
}
export default config
The setupFiles option loads a mock for the Chrome API. In the next step, we will create this mock.
The testEnvironment option sets a browser testing environment by default. We can override the environment at the top
of each test file:
/**
 * @jest-environment jsdom
 */
The transform option specifies to process TypeScript test files with ts-jest.
Create a mock for the Chrome API
Our extension code relies on the Chrome API, which is unavailable in our unit test environment. We will create a mock for the Chrome API to simulate its behavior in our tests.
A mock is a fake implementation of a function or object that allows us to test our code in isolation. Mocks are helpful for testing code that depends on external services or APIs.
Create a __mocks__ folder in the root of the project. The __mocks__ name is a Jest convention for mock files. In
that folder, add a chrome.ts file with the following content:
// eslint-disable-next-line @typescript-eslint/ban-ts-comment -- disable ESLint check for the next line
// @ts-nocheck -- this TS comment turns off TypeScript type checking for this file because we do not
// mock the entire Chrome API, but only the parts we need
global.chrome = {
    runtime: {
        onInstalled: {
            addListener: jest.fn(),
        },
        onMessage: {
            addListener: jest.fn(),
        },
        onStartup: {
            addListener: jest.fn(),
        },
        sendMessage: jest.fn(),
    },
    storage: {
        sync: {
            get: jest.fn(),
            set: jest.fn(),
        },
    },
}
The empty jest.fn() implementations can be replaced during testing with custom behavior using Jest’s mocking functions
using jest.spyOn.
Write a unit test
We will test the content.ts file in our first unit test. This file contains the logic for the content script that runs
on web pages when the extension is active. The content script blurs a page element that contains a user-defined keyword.
Create a content.test.ts file in the src folder with the following content:
import { blurFilter, observe, config } from "./content"

describe("blur", () => {
  test("blur a secret", () => {
    // Define the document (web page) that we will test against
    document.body.innerHTML = `
    <div id="testDiv">
      "My secret"
    </div>`
    // Set value to blur
    config.item = "secret"
    // Start observing the document.
    observe()
    // Make sure the element is blurred as expected
    const testDiv = document.getElementById("testDiv") as HTMLInputElement
    expect(testDiv).toBeDefined()
    expect(testDiv.style.filter).toBe(blurFilter)
  })
})
In the above test, the Jest functions describe and test define a test suite and a test case, respectively. The
expect function checks whether the test results match the expected values.
Run the unit tests
The Jest unit test can be run using the following command:
npx jest
The result of the test should look like:
  console.debug
    blurred id:testDiv class: tag:DIV text:
          "My secret"

      at blurElement (src/content.ts:36:11)
          at Array.forEach (<anonymous>)
          at Array.forEach (<anonymous>)
          at Array.forEach (<anonymous>)
          at Array.forEach (<anonymous>)

 PASS  src/content.test.ts
  blur
    ✓ blur a secret (15 ms)

Test Suites: 1 passed, 1 total
Tests:       1 passed, 1 total
Snapshots:   0 total
Time:        1.149 s
Ran all test suites.
Add the following script to the package.json file:
"scripts": {
  "test": "jest",
}
Now you can run the tests using the npm test or npm run test.
Review unit test coverage
Code coverage measures how much of the code is tested by the unit tests. A high percentage indicates that most of the code is tested and less likely to contain bugs. Code coverage is an important metric for assessing the quality of the code. A common target for code coverage is 80% or higher.
Jest can generate a code coverage report to show which parts of the code are covered by the unit tests. To create a
coverage report, add the --coverage flag to the Jest command:
npx jest --coverage
The terminal output will include the code coverage summary:
------------|---------|----------|---------|---------|--------------------------
File        | % Stmts | % Branch | % Funcs | % Lines | Uncovered Line #s
------------|---------|----------|---------|---------|--------------------------
All files   |   45.23 |    48.57 |   42.85 |   45.23 |
 content.ts |   45.23 |    48.57 |   42.85 |   45.23 | 22,26,50-54,62-69,88-117
------------|---------|----------|---------|---------|--------------------------
The full report is available in the coverage folder. Open the coverage/lcov-report/index.html file in a browser to
view the detailed coverage report.
Note that the code coverage report only includes the files in the test run. If you want to include all files in the
coverage report, we can add the collectCoverageFrom option to the jest.config.ts Jest configuration file:
collectCoverageFrom: ["src/**/*.ts"],
Now, the report shows a complete picture:
---------------|---------|----------|---------|---------|--------------------------
File           | % Stmts | % Branch | % Funcs | % Lines | Uncovered Line #s
---------------|---------|----------|---------|---------|--------------------------
All files      |   16.96 |     30.9 |   10.71 |   16.96 |
 background.ts |       0 |        0 |       0 |       0 | 1-21
 common.ts     |       0 |        0 |       0 |       0 | 17-19
 content.ts    |   45.23 |    48.57 |   42.85 |   45.23 | 22,26,50-54,62-69,88-117
 options.ts    |       0 |        0 |       0 |       0 | 2-31
 popup.ts      |       0 |        0 |       0 |       0 | 1-86
---------------|---------|----------|---------|---------|--------------------------
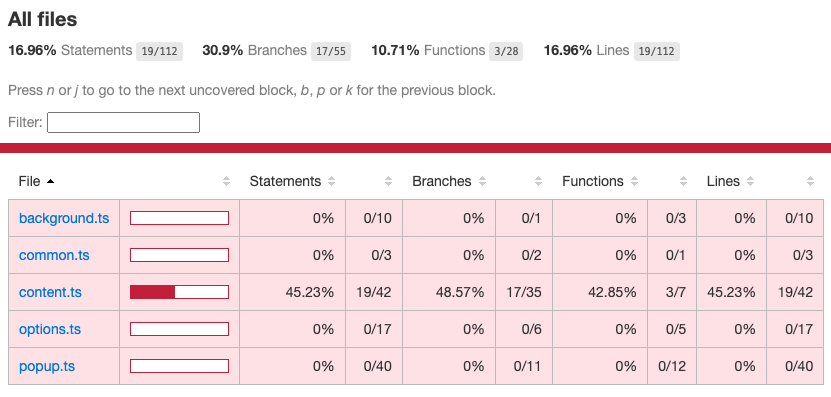
HTML coverage report
Adding unit tests to GitHub Actions
To make sure that our unit tests are run automatically on every push to the repository, we can add them to a GitHub Actions workflow. In the Linting and formatting TypeScript article, we added ESLint to GitHub Actions. We can add a step to run the Jest tests in the same workflow.
      - name: Test
        run: |
          npm run test
Unit test code on GitHub
The complete code is available on GitHub at: https://github.com/getvictor/create-chrome-extension/tree/main/7-unit-tests
Other articles on Unit Testing
Watch how we set up unit testing for our Chrome extension
Note: If you want to comment on this article, please do so on the YouTube video.