
- Setting up linting with ESLint and typescript-eslint
- Setting up formatting with Prettier
- Adding linting and formatting to CI
This article is part of a series on building a maintainable Chrome extension.
In the previous article, we added TypeScript code for communicating between parts of a Chrome extension. This check-in will be our starting point for this article. This article will add linting and formatting to our TypeScript code, which will help us catch errors and enforce a consistent code style for larger teams.
What is linting?
Linting is the process of running a static code analysis program to analyze code for potential errors. Linters can catch syntax errors, typos, and other common mistakes that can lead to bugs. They can also enforce coding standards, such as indentation, variable naming, and other style rules.
What is formatting?
Formatting automatically changes the code’s appearance to match a specific style guide. Formatting tools can automatically add or remove whitespace, change indentation, and reformat code to make it more readable. Formatting tools can enforce a consistent code style across a project.
Why use linting and formatting tools?
Linters and formatters work together to help developers write better code and accelerate the development process – linters flag errors, while formatters automatically enforce a consistent code style.
Together, they can help prevent bugs, improve code quality, and make it easier for developers to read and understand the code. The result is cleaner, more maintainable code that uses many coding best practices and is easier to work with.
Linting can also teach developers about best practices and help them avoid common pitfalls. For example, a linter can
flag misused promises, such as missing await or uncaught errors.
Setting up linting with ESLint and typescript-eslint
To set up linting for TypeScript code, we will use ESLint with the typescript-eslint plugin. ESLint is a popular linter that can analyze JavaScript and TypeScript code. The typescript-eslint plugin adds TypeScript-specific rules to ESLint.
To set up ESLint with typescript-eslint, we need to install the following packages:
npm install --save-dev eslint @eslint/js @types/eslint__js typescript-eslint
Next, we need to create an ESLint configuration file. We will create an eslint.config.mjs file at the root of our
project:
// @ts-check

import eslint from '@eslint/js'
import tseslint from "typescript-eslint"

const config = tseslint.config(
    eslint.configs.recommended,
    ...tseslint.configs.recommendedTypeChecked,
    ...tseslint.configs.stylisticTypeChecked,
    {
        ignores: ["dist/**/*"],
    },
    {
        languageOptions: {
            parserOptions: {
                project: true,
                tsconfigRootDir: import.meta.dirname,
            },
        },
    },
)

export default config
This configuration file sets up ESLint with the recommended TypeScript type-checked rules and ignores our dist
directory containing the webpack-generated bundles.
Why use the .mjs extension instead of .js for the configuration file?
We are using .mjs extension for the configuration file to take advantage of ECMAScript modules. Using ES modules
allows us to import and export modules using the import and export keywords. There are other ways to enable
ECMAScript modules in JavaScript for our project, but this is the simplest way for just one JavaScript file. Our
TypeScript files already use ECMAScript modules via these included recommended tsconfig.json settings:
{
  "compilerOptions": {
    "module": "commonjs",
    "esModuleInterop": true,
If we used .js extension for the configuration file, we would need to use require and module.exports syntax.
Otherwise, we would get an error like this:
/Users/victor/work/create-chrome-extension/4-linting-and-formatting/eslint.config.js:3
import eslint from '@eslint/js'
^^^^^^

SyntaxError: Cannot use import statement outside a module
    at internalCompileFunction (node:internal/vm:77:18)
    at wrapSafe (node:internal/modules/cjs/loader:1288:20)
    at Module._compile (node:internal/modules/cjs/loader:1340:27)
    at Module._extensions..js (node:internal/modules/cjs/loader:1435:10)
    at Module.load (node:internal/modules/cjs/loader:1207:32)
    at Module._load (node:internal/modules/cjs/loader:1023:12)
    at cjsLoader (node:internal/modules/esm/translators:356:17)
    at ModuleWrap.<anonymous> (node:internal/modules/esm/translators:305:7)
    at ModuleJob.run (node:internal/modules/esm/module_job:218:25)
    at async ModuleLoader.import (node:internal/modules/esm/loader:329:24)
Running ESLint
We can run ESLint from the command line using the following command:
./node_modules/.bin/eslint .
Alternatively, we can use npx, which is a package runner tool that comes with npm:
npx eslint .
This command will run ESLint on all TypeScript files in the current directory and subdirectories. ESLint will output any errors or warnings it finds in the code, such as:
/Users/victor/work/create-chrome-extension/4-linting-and-formatting/src/background.ts
  14:17  error  Unsafe member access .enabled on an `any` value  @typescript-eslint/no-unsafe-member-access

/Users/victor/work/create-chrome-extension/4-linting-and-formatting/src/content.ts
  51:9   error  Unsafe assignment of an `any` value              @typescript-eslint/no-unsafe-assignment
  74:17  error  Unsafe member access .enabled on an `any` value  @typescript-eslint/no-unsafe-member-access
  76:9   error  Unsafe assignment of an `any` value              @typescript-eslint/no-unsafe-assignment
  76:27  error  Unsafe member access .enabled on an `any` value  @typescript-eslint/no-unsafe-member-access

/Users/victor/work/create-chrome-extension/4-linting-and-formatting/src/popup.ts
   9:23  error  Unsafe argument of type `any` assigned to a parameter of type `boolean`  @typescript-eslint/no-unsafe-argument
  11:37  error  Promise returned in function argument where a void return was expected   @typescript-eslint/no-misused-promises
  23:34  error  Unsafe member access .title on an `any` value                            @typescript-eslint/no-unsafe-member-access
  23:50  error  Unsafe member access .url on an `any` value                              @typescript-eslint/no-unsafe-member-access
  43:5   error  Unsafe assignment of an `any` value                                      @typescript-eslint/no-unsafe-assignment

✖ 10 problems (10 errors, 0 warnings)
At this point, we should fix the errors and warnings that ESLint has found in our code.
We can also update the scripts section of our package.json file to run ESLint with npm run:
  "scripts": {
    "lint": "eslint .",
Now we can run ESLint with the following command:
npm run lint
Setting up formatting with Prettier
To format TypeScript code, we will use Prettier. Prettier is a popular code formatter that automatically formats code to match a specific style guide.
To set up Prettier, we need to install the following package:
npm install --save-dev --save-exact prettier
Next, create a .prettierignore file in the root of our project to ignore the dist directory:
/dist
By default, Prettier ignores the node_modules directory.
Next, create a .prettierrc file in the root of our project to configure Prettier:
{
  "semi": false
}
We will use the default Prettier settings but turn off the semi rule to remove semicolons from the end of TypeScript
lines. Removing semicolons is a common style choice in modern JavaScript and TypeScript code.
Running Prettier
We can run Prettier from the command line using the following command:
npx prettier --write .
This command will format all eligible files in the current directory and subdirectories.
We can also update the scripts section of our package.json file to run Prettier with the following command:
  "scripts": {
    "format": "prettier --write .",
    "format-check": "prettier --check .",
npm run format will format all eligible files, while npm run format-check will check if the files are formatted.
Adding linting and formatting to continuous integration (CI)
We will use GitHub Actions to automate linting and formatting checks on every pull request and commit to our main branch. This will make sure all code changes are linted and formatted correctly on the main branch.
This automatic check means that all contributors can expect that the code they are working on uses a consistent style and meets a quality standard. Consistency is beneficial for open-source projects where contributors may not be familiar with the codebase.
To set up GitHub Actions, create a .github/workflows/lint-and-format.yml file in the root of our git repository:
name: Lint check, format check, and build

on:
  push:
    branches:
      - main
    paths: # We only run the workflow if the code in these files/directories changes
      - '.github/workflows/lint-and-format.yml' # This file
      - '4-linting-and-formatting/**' # The working directory for this article
  pull_request:
    paths:
      - '.github/workflows/lint-and-format.yml'
      - '4-linting-and-formatting/**'

# This allows a subsequently queued workflow run to interrupt previous runs
concurrency:
  group: ${{ github.workflow }}-${{ github.head_ref || github.run_id}}
  cancel-in-progress: true

defaults:
  run:
    shell: bash
    working-directory: ./4-linting-and-formatting


permissions:
  contents: read

jobs:
  lint-format-build:
    runs-on: ubuntu-latest
    steps:
      - name: Checkout
        uses: actions/checkout@v4

      - name: Install dependencies
        run: |
          npm install --no-save

      - name: Format check and lint
        run: |
          npm run format-check
          npm run lint

      - name: Build
        run: |
          npm run build
Since our git repository is shared by multiple projects (from various articles), we use the paths key to only run the
workflow when the code in the 4-linting-and-formatting directory changes.
After pushing our code to GitHub and waiting for the GitHub Actions workflow to run, we can see the results in the Actions tab of our repository. We can see the linting and formatting checks, as well as the build step:
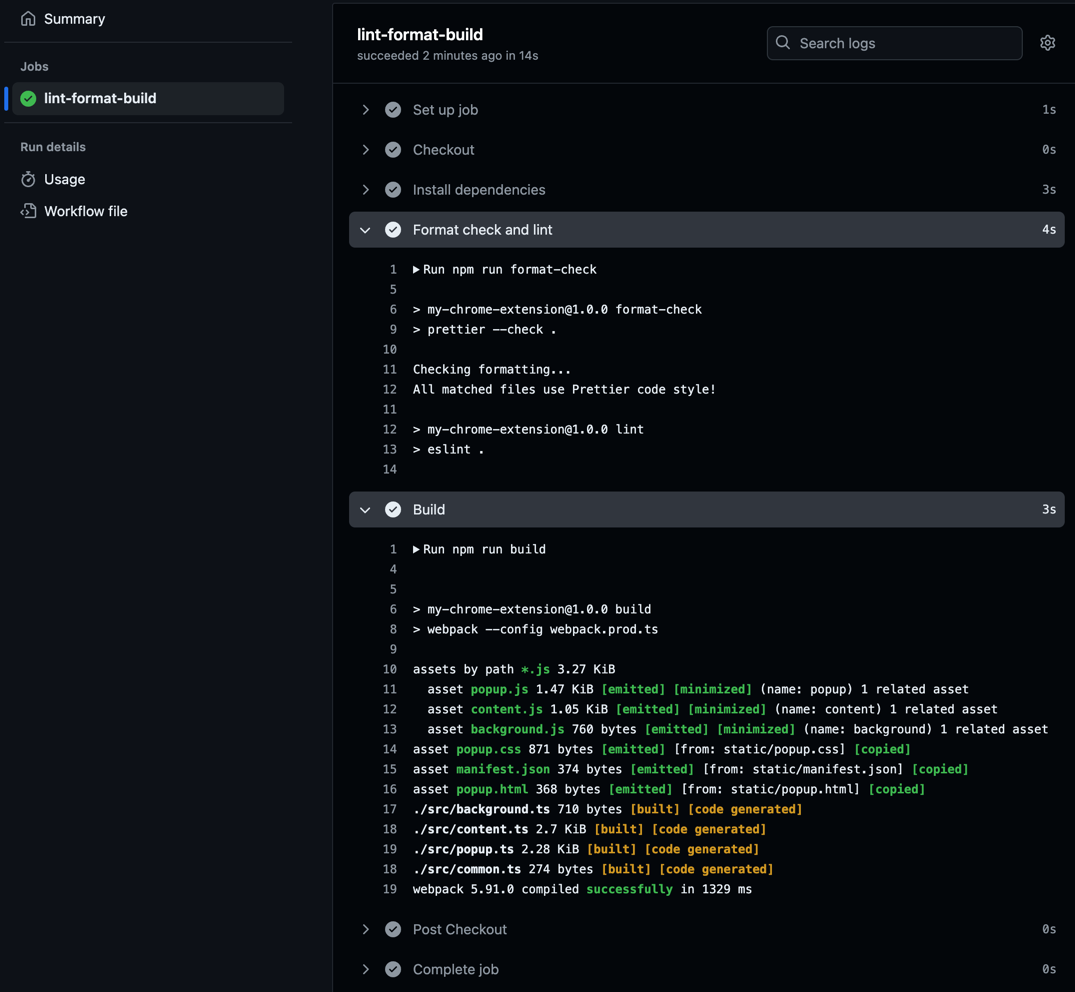
GitHub Actions workflow results
For more details on GitHub Actions workflows, see our article on reusing GitHub Actions workflows and steps.
Adding stricter linting rules to typescript-eslint
The recommended ruleset is a good starting point for linting TypeScript code. However, we can add stricter rules to
catch even more potential issues in our code. It is easiest to start with strict rules early in the project when fixing
issues is relatively painless. Otherwise, it is a good idea to gradually add stricter rules to avoid overwhelming
developers with too many errors and warnings.
To switch to a stricter, more opinionated ruleset, replace tseslint.configs.recommendedTypeChecked with
tseslint.configs.strictTypeChecked in the eslint.config.mjs file.
ESLint rules can be configured or disabled using configuration comments in the code or the ESLint configuration file. For more details, see the ESLint configure rules.
Next steps
In the next part of this series, we will add an options page to our Chrome extension. This page will allow users to configure the extension’s behavior and settings.
Linting and formatting TypeScript code on GitHub
The complete code is available on GitHub at: https://github.com/getvictor/create-chrome-extension/tree/main/4-linting-and-formatting
Linting and formatting TypeScript video
Note: If you want to comment on this article, please do so on the YouTube video.