
This article is part of a series on creating a production-ready Chrome extension. The previous article covered creating a basic Chrome extension without any tooling. For a list of all articles in the series, see the Chrome extension series overview.
Introduction
This article will add the webpack module bundler and TypeScript support to the Chrome extension we created in the previous article. This software tooling will allow us to use modern JavaScript features and development tools.
A module bundler and TypeScript are essential tools for modern web development. They improve the development experience for large or long-running projects.
Prerequisites - Node.js and npm
Before we start, make sure you have Node.js and npm installed. Node.js is a JavaScript runtime. We will use it to run webpack and future development tools. npm is a JavaScript package manager.
You can check if you have them installed by running the following commands:
node -v
npm -v
package.json
First, we will create a package.json file containing project and dependency info. We can use the npm init command to create the file. Or manually create one containing something like:
{
  "name": "my-chrome-extension",
  "version": "0.1.0",
  "repository": "https://github.com/getvictor/create-chrome-extension",
  "author": "getvictor",
  "license": "MIT"
}
What is webpack?
Webpack is a module bundler for JavaScript applications. It takes modules with dependencies and generates static assets representing those modules. We will use webpack to bundle multiple JavaScript files into a single file.
A module bundler allows you to write modular code and bundle it into a single file. TypeScript is a superset of JavaScript that adds static typing and other features to the language.
We will install webpack with npm:
npm install --save-dev webpack webpack-cli webpack-merge copy-webpack-plugin
- webpack is the core module bundler
- webpack-cli is the command-line interface for webpack
- webpack-merge is a utility to merge multiple webpack configurations, which we will use to differentiate development and production configs
- copy-webpack-plugin is a plugin to copy files and directories in webpack
The above npm command will install the packages, create a package-lock.json file, and add them to the devDependencies section of the package.json file. The updated package.json should look like this:
{
  "name": "my-chrome-extension",
  "version": "0.1.0",
  "repository": "https://github.com/getvictor/create-chrome-extension",
  "author": "getvictor",
  "license": "MIT",
  "devDependencies": {
    "copy-webpack-plugin": "^12.0.2",
    "webpack": "^5.91.0",
    "webpack-cli": "^5.1.4",
    "webpack-merge": "^5.10.0"
  }
}
webpack configuration
Next, we will create webpack configuration files. Webpack uses a configuration file to define how to bundle the project. We will create two configurations: one for development and one for production. Initially, we will use JavaScript for the configuration files, but we will convert them to TypeScript later.
Create a webpack.common.js file with the shared configuration:
const path = require('path')
const CopyWebpackPlugin = require('copy-webpack-plugin');

module.exports = {
    entry: {
        background: './src/background.js',
        content: './src/content.js',
        popup: './src/popup.js',
    },
    output: {
        filename: '[name].js',
        path: path.resolve(__dirname, 'dist'),
        clean: true, // Clean the output directory before emit.
    },
    plugins: [
        new CopyWebpackPlugin({
            patterns: [{ from: 'static' }],
        }),
    ]
}
Create a webpack.dev.js file with the development configuration:
const { merge } = require('webpack-merge')
const common = require('./webpack.common.js')

module.exports = merge(common, {
    mode: 'development',
    devtool: 'inline-source-map',
})
Create a webpack.prod.js file with the production configuration:
const { merge } = require('webpack-merge')
const common = require('./webpack.common.js')

module.exports = merge(common, {
    mode: 'production',
    devtool: 'source-map',
})
Refactoring directory structure
We will refactor the directory structure to separate the source code from the static files. Create a src directory and move the JavaScript files (background.js, content.js, popup.js) into it. Create a static directory and move the manifest.json, popup.html, and popup.css file into it.
The directory structure should look like this (running tree . -I node_modules):
.
├── package-lock.json
├── package.json
├── src
│   ├── background.js
│   ├── content.js
│   └── popup.js
├── static
│   ├── manifest.json
│   ├── popup.css
│   └── popup.html
├── webpack.common.js
├── webpack.dev.js
└── webpack.prod.js
Running webpack
Now, we can run the webpack bundler using the following command:
./node_modules/.bin/webpack --watch --config webpack.dev.js
This command creates a dist directory with the bundled files. The --watch flag tells webpack to continue running, watch for changes, and recompile the files when changes occur. This recompilation is crucial for development, as it allows us to see our code changes in real time.
We can run the production build with:
./node_modules/.bin/webpack --config webpack.prod.js
Now, we can add scripts to the package.json file to simplify how we run webpack:
  ...
  "scripts": {
    "build": "webpack --config webpack.prod.js",
    "start": "webpack --watch --config webpack.dev.js"
  }
These scripts allow us to run npm run build to build the production version and npm start (or npm run start) to start the development version.
At this point, we can test the browser extension to ensure it is still working as before. Open the Chrome browser, go to chrome://extensions, enable Developer mode, click on Load unpacked, and select the dist directory.
What is TypeScript?
TypeScript is a superset of JavaScript that adds static typing and other features to the language. It compiles to plain JavaScript and can be used in any browser or JavaScript engine. Although TypeScript is not required for writing Chrome extensions, it is highly recommended as it can help catch errors early and improve code quality.
We install TypeScript with:
npm install --save-dev typescript @tsconfig/recommended ts-node ts-loader @types/chrome
- typescript is the core TypeScript compiler
- @tsconfig/recommended is a recommended TypeScript configuration, which we will use
- ts-node is a TypeScript execution environment for Node.js, which is needed for converting the webpack configuration to TypeScript
- ts-loader is a TypeScript loader for webpack, which is needed for webpack to understand TypeScript source files
- @types/chrome is the TypeScript type definitions for the Chrome extension API
What are TypeScript type definitions?
We loaded the @types/chrome packages to provide TypeScript type definitions for the Chrome extension API.
TypeScript type definitions are files that describe the shape of a JavaScript library. They provide type information for JavaScript libraries that were not written in TypeScript. This information allows TypeScript to understand the library’s API and provide type checking. With this information, TypeScript can check our code.
@types/chrome provides a global chrome object representing the Chrome extension API. No additional code is needed to use it from the command line, as TypeScript automatically loads it. However, IDEs may need to be configured to recognize this global type definition.
tsconfig.json
Next, we will create a tsconfig.json file to configure TypeScript. This file tells the TypeScript compiler how to compile the project. Create a tsconfig.json file with the recommended config:
{
 "extends": "@tsconfig/recommended/tsconfig.json",
 "compilerOptions": {
  "sourceMap": true
 }
}
We added the sourceMap option to generate source maps, which help debug TypeScript code in the browser.
Convert webpack configuration from JavaScript to TypeScript
First, rename the webpack configuration files to TypeScript files by changing the extension from .js to .ts. For example, webpack.common.js becomes webpack.common.ts. Then, update the contents of the files to TypeScript syntax.
webpack.common.ts:
import path from 'path'
import webpack from 'webpack'
import CopyWebpackPlugin from 'copy-webpack-plugin'

const config: webpack.Configuration = {
    entry: {
        background: './src/background.ts',
        content: './src/content.ts',
        popup: './src/popup.ts',
    },
    output: {
        filename: '[name].js',
        path: path.resolve(__dirname, 'dist'),
        clean: true, // Clean the output directory before emit.
    },
    plugins: [
        new CopyWebpackPlugin({
            patterns: [{from: 'static'}],
        }),
    ]
}

export default config
We made the following changes to the shared config:
- We changed the
requirestatements toimportstatements - We changed the
module.exportstoexport default - We added the
webpack.Configurationtype from thewebpackpackage
webpack.dev.ts:
import {Configuration} from 'webpack'
import {merge} from 'webpack-merge'
import config from './webpack.common'

const merged = merge<Configuration>(config,{
    mode: 'development',
    devtool: 'inline-source-map',
})

export default merged
webpack.prod.ts:
import {Configuration} from 'webpack'
import {merge} from 'webpack-merge'
import config from './webpack.common'

const merged = merge<Configuration>(config,{
    mode: 'production',
    devtool: 'source-map',
})

export default merged
And update the package.json scripts to use the TypeScript configuration files:
  ...
  "scripts": {
    "build": "webpack --config webpack.prod.ts",
    "start": "webpack --watch --config webpack.dev.ts"
  }
We can test npm run start and npm run build to ensure the new webpack Typescript configurations are working correctly.
Convert JavaScript source files to TypeScript
Finally, we will convert the JavaScript source files to TypeScript. Rename the .js files to .ts files. For example, background.js becomes background.ts. Update the contents of the files to TypeScript syntax.
Also, we will refactor the common setBadgeText function to a shared common.ts file:
export function setBadgeText(enabled: boolean) {
    const text = enabled ? "ON" : "OFF"
    void chrome.action.setBadgeText({text: text})
}
Updated background.ts:
import {setBadgeText} from "./common"

function startUp() {
    chrome.storage.sync.get("enabled", (data) => {
        setBadgeText(!!data.enabled)
    })
}

// Ensure the background script always runs.
chrome.runtime.onStartup.addListener(startUp)
chrome.runtime.onInstalled.addListener(startUp)
Updated content.ts:
const blurFilter = "blur(6px)"
let textToBlur = ""

// Search this DOM node for text to blur and blur the parent element if found.
function processNode(node: Node) {
    if (node.childNodes.length > 0) {
        Array.from(node.childNodes).forEach(processNode)
    }
    if (node.nodeType === Node.TEXT_NODE &&
        node.textContent !== null && node.textContent.trim().length > 0) {
        const parent = node.parentElement
        if (parent == null) {
            return
        }
        if (parent.tagName === 'SCRIPT' || parent.style.filter === blurFilter) {
            // Already blurred
            return
        }
        if (node.textContent.includes(textToBlur)) {
            blurElement(parent)
        }
    }
}

function blurElement(elem: HTMLElement) {
    elem.style.filter = blurFilter
    console.debug("blurred id:" + elem.id + " class:" + elem.className +
        " tag:" + elem.tagName + " text:" + elem.textContent)
}

// Create a MutationObserver to watch for changes to the DOM.
const observer = new MutationObserver((mutations) => {
    mutations.forEach((mutation) => {
        if (mutation.addedNodes.length > 0) {
            mutation.addedNodes.forEach(processNode)
        } else {
            processNode(mutation.target)
        }
    })
})

// Enable the content script by default.
let enabled = true
const keys = ["enabled", "item"]

chrome.storage.sync.get(keys, (data) => {
    if (data.enabled === false) {
        enabled = false
    }
    if (data.item) {
        textToBlur = data.item
    }
    // Only start observing the DOM if the extension is enabled and there is text to blur.
    if (enabled && textToBlur.trim().length > 0) {
        observer.observe(document, {
            attributes: false,
            characterData: true,
            childList: true,
            subtree: true,
        })
        // Loop through all elements on the page for initial processing.
        processNode(document)
    }
})
Updated popup.ts:
import {setBadgeText} from "./common"

console.log("Hello, world from popup!")

// Handle the ON/OFF switch
const checkbox = document.getElementById("enabled") as HTMLInputElement
chrome.storage.sync.get("enabled", (data) => {
    checkbox.checked = !!data.enabled
    void setBadgeText(data.enabled)
})
checkbox.addEventListener("change", (event) => {
    if (event.target instanceof HTMLInputElement) {
        void chrome.storage.sync.set({"enabled": event.target.checked})
        void setBadgeText(event.target.checked)
    }
})

// Handle the input field
const input = document.getElementById("item") as HTMLInputElement
chrome.storage.sync.get("item", (data) => {
    input.value = data.item || ""
});
input.addEventListener("change", (event) => {
    if (event.target instanceof HTMLInputElement) {
        void chrome.storage.sync.set({"item": event.target.value})
    }
})
Update webpack configuration to handle TypeScript source files
Update webpack.common.ts to use the new TypeScript source files and add the ts-loader to the webpack configuration:
import path from 'path'
import webpack from 'webpack'
import CopyWebpackPlugin from 'copy-webpack-plugin'

const config: webpack.Configuration = {
    entry: {
        background: './src/background.ts',
        content: './src/content.ts',
        popup: './src/popup.ts',
    },
    resolve: {
        extensions: [".ts"],
    },
    module: {
        rules: [
            {
                test: /\.ts$/,
                loader: "ts-loader",
                exclude: /node_modules/,
            },
        ],
    },
    output: {
        filename: '[name].js',
        path: path.resolve(__dirname, 'dist'),
        clean: true, // Clean the output directory before emit.
    },
    plugins: [
        new CopyWebpackPlugin({
            patterns: [{from: 'static'}],
        }),
    ]
}

export default config
Debug our TypeScript extension in Chrome
Build the extension with npm run start and load it in Chrome.
Right-click the extension icon (M) and select Inspect popup to open the Chrome Developer Tools. By default, you can see the console logs from the popup.ts file.
Go to the Sources tab in the Chrome Developer Tools and open the top/my-chrome-extension/src/popup.ts file. You can set breakpoints and debug the popup script.
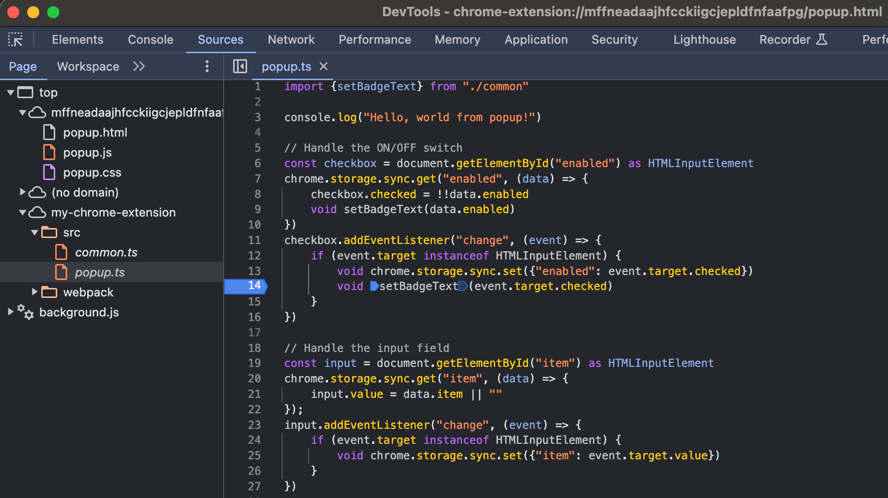
Debugging Chrome extension popup
The popup.ts file should exactly match the TypeScript code we wrote. You can set breakpoints, inspect variables, and step through the code.
Next steps
In the next part of this series, we will add message passing between the content script, the background script, and the popup script. This communication will allow us to make real-time changes across all parts of our Chrome extension.
Chrome extension with webpack and TypeScript code on GitHub
The complete code is available on GitHub at: https://github.com/getvictor/create-chrome-extension/tree/main/2-webpack-typescript
Add webpack and TypeScript to a Chrome extension video
Note: If you want to comment on this article, please do so on the YouTube video.