
This article is part of a series on building a complete production-ready Chrome extension.
In the first article of the series, we introduced the main parts of a Chrome extension – the service worker (background script), content script, and popup. This article will add a fourth part to our Chrome extension – an options page. This page will allow users to configure the extension’s behavior and settings.
Why add an options page?
An options page is a user-friendly way for users to customize the extension to their needs. It can be as simple as a few checkboxes or as complex as a full settings page with multiple tabs. Users can access the options page from the Chrome extension’s popup or the Chrome extension’s context menu.
Adding an options page
To add an options page to our Chrome extension, we need to create a new HTML file and add it to the extension’s manifest. Our options page will be a simple HTML file with some JavaScript to handle user interactions.
Our example options page will allow a user to exclude a web host, like victoronsoftware.com, from the extension’s functionality. The extension will store the excluded host in the extension’s local storage.
We will add several new files, update the extension’s configuration, and update the existing files.
Add a new file options.html to the static folder:
<!doctype html>
<html lang="en">
<head>
    <title>Advanced options</title>
    <link rel="stylesheet" type="text/css" href="options.css"/>
</head>
<body>
<h2>Advanced options</h2>
<h3>Web host to exclude</h3>
<input id="exclude_host" type="text"/>
<script src="options.js"></script>
</body>
</html>
Add a new file options.css to the static folder:
#exclude_host {
    margin: 5px;
    width: 500px;
}
Add a new file options.ts to the src folder, which will watch for changes on the options page:
import {Message, StoredConfig} from "./common"

chrome.storage.sync.get(null, (data) => {
    const config = data as StoredConfig
    const excludeHost = config.excludeHost ?? ""
    const input = document.getElementById(
        `exclude_host`,
    ) as HTMLInputElement
    input.value = excludeHost
    input.addEventListener("change", (event) => {
        if (event.target instanceof HTMLInputElement) {
            const updatedExcludeWebsite = event.target.value
            const updatedConfig: StoredConfig = {excludeHost: updatedExcludeWebsite}
            void chrome.storage.sync.set(updatedConfig)
            // Send message to content script in all tabs
            void chrome.tabs
                .query({})
                .then((tabs) => {
                    const message: Message = {excludeHost: updatedExcludeWebsite}
                    for (const tab of tabs) {
                        if (tab.id !== undefined) {
                            chrome.tabs
                                .sendMessage(tab.id, message)
                                .catch(() => {
                                    // We ignore tabs without a proper URL, like chrome://extensions/
                                    // Do nothing
                                })
                        }
                    }
                })
                .catch((error: unknown) => {
                    console.error("Could not query tabs", error)
                })
        }
    })
})
The types in src/common.ts need to be updated to include the new excludeHost field:
export interface Message {
    enabled?: boolean
    excludeHost?: string
}

export interface StoredConfig {
    enabled?: boolean
    item?: string
    excludeHost?: string
}
The content script src/content.ts needs to be updated to handle the new excludeHost setting. See the updated file
here.
We need to update the extension’s manifest to include the new options page. Add the following to the manifest.json
file:
{
  "options_page": "static/options.html"
}
In addition, we need to tell webpack to compile the new options.ts file. Update the webpack.common.ts file to
include the new entry point:
  entry: {
    background: "./src/background.ts",
    content: "./src/content.ts",
    popup: "./src/popup.ts",
    options: "./src/options.ts",
  },
Testing the options page
To test the options page, load the extension in Chrome and right-click on its icon. You should see a new Options item.
Clicking on this item will open the options page.
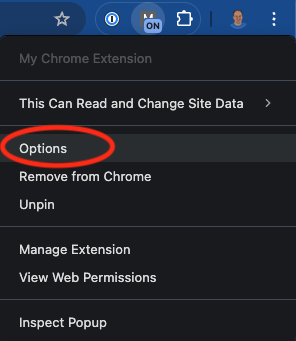
New Options selection
Adding a link to the options page
We can add a link to the popup to make it easier for users to access the options page. Update the popup.html file to
include a link to the options page:
<button id="go-to-options" class="button-link">Advanced options</button>
Add the CSS for the link:
.button-link {
    margin: 10px;
    background: none !important;
    border: none;
    padding: 0 !important;
    font-family: arial, sans-serif;
    color: #069;
    text-decoration: underline;
    cursor: pointer;
}
And add the TypeScript in popup.ts to handle the link click:
// Options page
const optionsElement = document.querySelector("#go-to-options")
if (!optionsElement) {
    console.error("Could not find options element")
} else {
    optionsElement.addEventListener("click", function () {
        // This code is based on Chrome for Developers documentation
        // eslint-disable-next-line @typescript-eslint/no-unnecessary-condition
        if (chrome.runtime.openOptionsPage) {
            chrome.runtime.openOptionsPage().catch((error: unknown) => {
                console.error("Could not open options page", error)
            })
        } else {
            window.open(chrome.runtime.getURL("options.html"))
        }
    })
}
We will now see the Advanced options link in the popup. Clicking on the link will take the user to the options page.
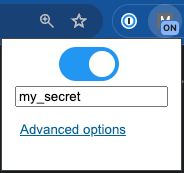
Popup with Advanced options link
Embedded options page
Instead of a full options page, Chrome extensions can use an embedded options page. However, this approach was confusing
and not user-friendly because Chrome takes the user to the extension details page. We recommend using a dedicated
options page. To try an embedded options page, add the following to the manifest.json file:
{
  "options_ui": {
    "page": "options.html",
    "open_in_tab": false
  }
}
Next steps
In the next part of this series, we will focus on the look of our popup and options page. We will add CSS to make it visually appealing and user-friendly.
Options page code on GitHub
The complete code is available on GitHub at: https://github.com/getvictor/create-chrome-extension/tree/main/5-options-page
Options page video
Note: If you want to comment on this article, please do so on the YouTube video.